この記事では、PyTorchのTorchtuneを使ったLlama3のファインチューニング(QLoRA)を紹介します。
Torchtuneを使って簡単にファインチューニングの実装ができるようになります。
TorchtuneでLlama3のファインチューニング(QLoRA)

Torchtuneとは
この記事では、PyTorchのTorchtuneを使って、Llama3のモデルにQLoRAファインチューニングをします。
Torchtuneはファインチューニングを簡単に実行するためのPyTorchネイティブのライブラリで、以下のような特徴があります。
- LoRA、QLoRA、フルファインチューニングなど複数のファインチューニングの方法を提供
- シングルGPUによる学習から、マルチGPUによる分散学習までの方法を提供
- あらゆる種類のデータセットが用意されており、簡単にファインチューニングを試せる
- YAML形式で、トレーニング、推論に使用するパラメータを指定して実行
- HuggingFace、bitsandbytes、WandBなどの外部のライブラリやツールが利用できる
QLoRA
QLoRAは、LoRAと量子化(Quantization)の2つの要素をもつファインチューニングの手法です。
LoRAは、モデルのパラメータを低ランク行列で近似することで、更新するパラメータ数を大幅に減らし計算量を削減しています。
量子化とは、モデルの精度を下げる代わりに、GPUメモリを大幅に節約する技術になります。
Llama3について詳しく知りたい方は、以下の記事をご覧ください。

HuggingFaceのSFTTrainerでファインチューニングする方法は別記事で解説しています。

Unslothを使ったファインチューニングについては別記事で解説しています。

使用するデータセット
モデルの学習にはデータセット「bbz662bbz/databricks-dolly-15k-ja-gozaru」を使用します。
15,000以上の指示と応答で構成された日本語データセットです。
応答の語尾が「ござる」の口調になっていることが特徴です。

事前準備

必要なスペック・実行環境
Llama3のQLoRAファインチューニングでは、大容量のGPUメモリを必要とします。
この記事では、GPUメモリ80GBを搭載したNVIDIA A100 80GBのインスタンスを使用しています。
実行環境の詳細は以下のとおりです。
- GPU:NVIDIA A100 80GB
- GPUメモリ(VRAM):80GB
- OS:Ubuntu22.04
- Docker
GPUメモリの使用量は、Githubが参考になります。
Llama3のモデル利用申請
Llama3のモデルを使うにあたって、利用申請が必要になります。
以下の記事で利用申請の方法を紹介しています。

Dockerで環境構築

Dockerを使用してLlama3の環境構築をしていきます。
Dockerの使い方は以下の記事をご覧ください。

Dokcerfileにインストールするパッケージを記述します。
- CUDA:12.1
- Python:3.10
- PyTorch:2.2.2
- Torchtune:0.2.0.dev20240607+cu121
- WandB
Ubuntuのコマンドラインから、Dockerfileを作成します。
mkdir llama3_torchtune
cd llama3_torchtune
nano Dockerfile
次の記述をコピーしてDokcerfileに貼り付けます。
# ベースイメージ(CUDA)の指定
FROM nvidia/cuda:12.1.0-cudnn8-devel-ubuntu22.04

# 必要なパッケージをインストール
RUN apt-get update && apt-get install -y python3-pip python3-venv git nano

# 作業ディレクトリを設定
WORKDIR /app

# アプリケーションコードをコピー
COPY . /app

# Python仮想環境の作成
RUN python3 -m venv /app/.venv

# 仮想環境をアクティベートするコマンドを.bashrcに追加
RUN echo "source /app/.venv/bin/activate" >> /root/.bashrc

# PyTorchのインストール
RUN /app/.venv/bin/pip install torch==2.2.2 torchvision==0.17.2 torchaudio==2.2.2 --index-url https://download.pytorch.org/whl/cu121

# Torchtuneのインストール
RUN /app/.venv/bin/pip install --pre torchtune --extra-index-url https://download.pytorch.org/whl/nightly/cu121

# Wandbのインストール
RUN /app/.venv/bin/pip install wandb

# コンテナの起動時にbashを実行
CMD ["/bin/bash"]docker-compose.ymlファイルを使ってDockerコンテナの設定をします。
docker-compose.ymlファイルを作成します。
nano docker-compose.yml次の記述をコピーしてdocker-compose.ymlに貼り付けます。
services:
  llama3_torchtune:
    build:
      context: .
      dockerfile: Dockerfile
    image: llama3_torchtune
    runtime: nvidia
    container_name: llama3_torchtune
    volumes:
      - .:/app/torchtune
    deploy:
      resources:
        reservations:
          devices:
            - driver: nvidia
              count: 1
capabilities: [gpu]Dockerfileからビルドしてコンテナを起動します。
docker compose run llama3_torchtuneLlama3ファインチューニングの実装

起動したDokcerコンテナ上で、Llama3のファインチューニングを実装していきます。
モデルとトークナイザーをダウンロードします。
tune download meta-llama/Meta-Llama-3-8B-Instruct \
--output-dir /app/torchtune/models \
--hf-token '************'meta-llama/Meta-Llama-3-8B-Instruct
ダウンロードするモデルIDになります。
–output-dir
モデルの保存先のパスを指定します。
–hf-token
Hugging Faceのアクセストークンが入ります。
Hugging Faceのアクセストークン作成方法は以下の記事で解説しています。

ファインチューニングをする前のモデルでテキスト生成のテストをしてみます。
テキスト生成の推論に使用するyamlファイルを作成します。
nano torchtune/inference_confg.yaml# Model Arguments
model:
_component_: torchtune.models.llama3.llama3_8b
checkpointer:
_component_: torchtune.utils.FullModelMetaCheckpointer
checkpoint_dir: /app/torchtune/models
checkpoint_files: [/app/torchtune/models/original/consolidated.00.pth]
recipe_checkpoint: null
output_dir: /app/torchtune/output
model_type: LLAMA3
device: cuda
dtype: bf16
seed: null
# Tokenizer arguments
tokenizer:
_component_: torchtune.models.llama3.llama3_tokenizer
path: /app/torchtune/models/original/tokenizer.model
# Generation arguments
prompt: "AirPodsとは何ですか"
max_new_tokens: 128
temperature: 0.8
top_k: 40
stop_tokens: "<|eot_id|>"
quantizer: nullテキスト生成のテストを実行します。
tune run generate --config torchtune/inference_confg.yamlAirPodsとは何ですか?
AirPods is a brand of wireless earbuds developed by Apple Inc. They were first released in 2016 and have since become one of the most popular and widely used earbuds on the market.
AirPods are designed to be a convenient and easy-to-use alternative to traditional earbuds. They are powered by a rechargeable lithium-ion battery and have a wireless range of up to 30 feet (9 meters). They are also sweat and water resistant, making them a great option for athletes and fitness enthusiasts.
One of the key features of AirPods is their ability to seamlessly connect to Apple devices such as
_custom.pyを作成します。
nano .venv/lib/python3.10/site-packages/torchtune/datasets/_custom.pyfrom typing import Any, List, Mapping
from torchtune.data import Message
from torchtune.modules.tokenizers import Tokenizer
from torchtune.datasets._chat import ChatDataset
def message_converter(
sample: Mapping[str, Any],
train_on_input: bool = True,
) -> List[Message]:
messages = [
Message(role="user", content=sample["instruction"]),
Message(role="assistant", content=sample["output"]),
]
return messages
def custom_dataset(
*,
tokenizer: Tokenizer,
source: str,
chat_format: str = None,
max_seq_len: int,
train_on_input: bool = True,
split: str,
) -> ChatDataset:
return ChatDataset(
tokenizer=tokenizer,
source=source,
convert_to_messages=message_converter,
chat_format=chat_format,
max_seq_len=max_seq_len,
train_on_input=train_on_input,
split=split,
)データセットの「__init__.py」ファイルを編集します。
nano .venv/lib/python3.10/site-packages/torchtune/datasets/__init__.py「__init__.py」ファイルに次の2つのコードを追加します。
from torchtune.datasets._custom import custom_dataset
custom_dataset
from torchtune.datasets._alpaca import alpaca_cleaned_dataset, alpaca_dataset
from torchtune.datasets._chat import chat_dataset, ChatDataset
from torchtune.datasets._cnn_dailymail import cnn_dailymail_articles_dataset
from torchtune.datasets._concat import ConcatDataset
from torchtune.datasets._grammar import grammar_dataset
from torchtune.datasets._instruct import instruct_dataset, InstructDataset
from torchtune.datasets._packed import PackedDataset
from torchtune.datasets._preference import PreferenceDataset
from torchtune.datasets._samsum import samsum_dataset
from torchtune.datasets._slimorca import slimorca_dataset
from torchtune.datasets._stack_exchanged_paired import stack_exchanged_paired_dataset
from torchtune.datasets._text_completion import (
    text_completion_dataset,
    TextCompletionDataset,
)
from torchtune.datasets._wikitext import wikitext_dataset
from torchtune.datasets._custom import custom_dataset #追加

__all__ = [
    "alpaca_dataset",
    "alpaca_cleaned_dataset",
    "grammar_dataset",
    "samsum_dataset",
    "stack_exchanged_paired_dataset",
    "InstructDataset",
    "slimorca_dataset",
    "ChatDataset",
    "instruct_dataset",
    "chat_dataset",
    "text_completion_dataset",
    "TextCompletionDataset",
    "cnn_dailymail_articles_dataset",
    "PackedDataset",
    "ConcatDataset",
    "wikitext_dataset",
    "PreferenceDataset",
    "custom_dataset",  #追加
]ファインチューニングに使用するYAMLファイルを作成します。
nano torchtune/finetune_gozaru.yaml以下の記述をコピーしてYAMLファイルに貼り付けます。
# Model Arguments
model:
  _component_: torchtune.models.llama3.qlora_llama3_8b
  lora_attn_modules: ["q_proj", "k_proj", "v_proj", "o_proj","gate_proj", "up_proj", "down_proj",]
  apply_lora_to_mlp: True
  apply_lora_to_output: True
  lora_rank: 8
  lora_alpha: 16

# Tokenizer
tokenizer:
  _component_: torchtune.models.llama3.llama3_tokenizer
  path: /app/torchtune/models/original/tokenizer.model

checkpointer:
  _component_: torchtune.utils.FullModelMetaCheckpointer
  checkpoint_dir: /app/torchtune/models/original/
  checkpoint_files: [
    consolidated.00.pth
  ]
  recipe_checkpoint: null
  output_dir: /app/torchtune/models/
  model_type: LLAMA3
resume_from_checkpoint: False

# Dataset and Sampler
dataset:
  _component_: torchtune.datasets.custom_dataset
  source: "bbz662bbz/databricks-dolly-15k-ja-gozaru"
  max_seq_len: 2048
  train_on_input: True
  split: train
seed: null
shuffle: True
batch_size: 8

# Optimizer and Scheduler
optimizer:
  _component_: torch.optim.AdamW
  weight_decay: 0.01
  lr: 2e-4
lr_scheduler:
  _component_: torchtune.modules.get_cosine_schedule_with_warmup
  num_warmup_steps: 100

loss:
  _component_: torch.nn.CrossEntropyLoss

# Training
epochs: 2
max_steps_per_epoch: null
gradient_accumulation_steps: 8
compile: False

# Logging
output_dir: /app/torchtune/output/
metric_logger:
  _component_: torchtune.utils.metric_logging.WandBLogger
  project: llama3_torchtune
log_every_n_steps: 1
log_peak_memory_stats: False

# Environment
device: cuda
dtype: bf16
enable_activation_checkpointing: True

# Profiler (disabled)
profiler:
  _component_: torchtune.utils.profiler
enabled: Falsecomponent: torchtune.models.llama3.qlora_llama3_8b
ファインチューニングのベースになるLlama3のモデルを指定しています。
デルの種類、ファインチューニングの種類とによってコマンドが異なりますので、詳細はPyTorchの公式サイトを参照してください。
target_modules = [“q_proj”,…
LoRAを適用する対象のトランスフォーマの層(Target modules)を指定します。
すべての線形層にLoRAを対象にすることでモデルの適応品質が向上すると言われています。
r=8
rはファインチューニングの過程で学習される低ランク行列のサイズを表します。
rを大きくするとモデルの適応品質が向上する傾向がありますが、必ずしも直線的な関係ではありません。
rが大きくなると更新されるパラメータが増えるため、メモリ使用量が増加します。
lora_alpha:16
LoRaスケーリングのAlphaパラメータは、学習した重みをスケーリングします。
多くの文献では、Alphaを調整可能なパラメータとして扱っておらず、Alphaを16に固定してます。
_component_: torchtune.models.llama3.llama3_tokenizer
Llama3のトークナイザーを指定しています。
source: “bbz662bbz/databricks-dolly-15k-ja-gozaru”
学習に使用するデータセットを指定しています。
batch_size: 8
バッチサイズを指定しています。GPUメモリが不足する場合は、値を小さくしてください。
gradient_accumulation_steps
勾配累積。この値を大きくすることで、擬似的にミニバッチのサイズを大きくすることができます。
component: torchtune.utils.metric_logging.WandBLogger
WandBにログを記録する指定をしています。他のロガーを使用する場合の指定は、PyTorch公式サイトをご参照ください。
学習ログの管理をするために、WandBにログインします。(WandBを使用しない場合は省略してください。)
wandb login ********- *************には、Wandbで発行したAPIキーが入ります。
- 「wandb: Appending key for api.wandb.ai to your netrc file: /root/.netrc」が返されたらログイン成功です。
WandbでAPIキーを発行する方法を以下の記事で解説しています。

ファインチューニングを実行します。
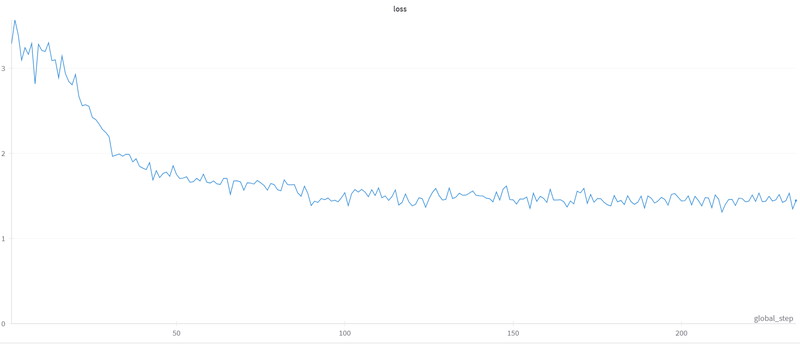
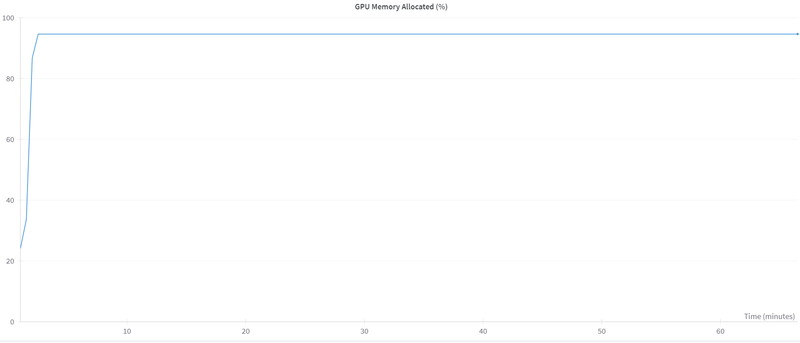
tune run lora_finetune_single_device --config torchtune/finetune_gozaru.yamlWandBに保存したファインチューニング実行中のメトリクスを確認します。
Loss(損失)は最初の50ステップで急速に減少し、その後は緩やかに小さくなり収束しています。

GPUメモリは、常に94%(75GB)を使用しています。

ファインチューニング後のモデルの確認

ファインチューニング後のモデルでテキスト生成をしていきます。
テキスト生成をする推論用YAMLファイルを作成します。
nano torchtune/finetuned_inference_confg.yaml以下のコードをコピーして、YAMLファイルに貼り付けます。
# Model Arguments
model:
  _component_: torchtune.models.llama3.llama3_8b

checkpointer:
  _component_: torchtune.utils.FullModelMetaCheckpointer
  checkpoint_dir: /app/torchtune/models/
  checkpoint_files: [meta_model_0.pt]
  recipe_checkpoint: null
  output_dir: /app/torchtune/output/
  model_type: LLAMA3

device: cuda
dtype: bf16

seed: null

# Tokenizer arguments
tokenizer:
  _component_: torchtune.models.llama3.llama3_tokenizer
  path: /app/torchtune/models/original/tokenizer.model

# Generation arguments
prompt: "AirPodsとは何ですか"
max_new_tokens: 128
temperature: 0.8
top_k: 40
stop_tokens: "<|eot_id|>"

quantizer: null
ファインチューニング後のモデルでテキスト生成(推論)を実行します。
tune run generate --config torchtune/finetuned_inference_confg.yamltorch.cuda.empty_cache()
テキスト生成を実行する前に、ファインチューニングで使用していたGPUメモリをリセットしています。
FastLanguageModel.from_pretrained(…
ファインチューニング後のモデルとトークナイザーを読み込んでいます。
“観葉植物の効果とは?”というプロンプトを実行します。
inputs = load_tokenizer(
    [
        alpaca_prompt.format(
        "観葉植物の効果とは?",
        "",
        )
    ], return_tensors = "pt").to("cuda")

outputs = load_model.generate(
    **inputs,
    max_new_tokens = 128,
    use_cache = True,
    temperature=0.6,
    top_p=0.9
)
decoded_outputs = load_tokenizer.batch_decode(outputs,skip_special_tokens=True)
print(decoded_outputs[0])
### Instruction:
観葉植物の効果とは?
### Response:
観葉植物は、空気を清浄化するでござる。
生成AI・LLMのコストでお困りなら
GPUのスペック不足で生成AIの開発が思うように進まないことはありませんか?
そんなときには、高性能なGPUをリーズナブルな価格で使えるGPUクラウドサービスがおすすめです!

GPUSOROBANは、生成AI・LLM向けの高速GPUを業界最安級の料金で使用することができます。
インターネット環境さえあれば、クラウド環境のGPUサーバーをすぐに利用可能です。
大規模な設備投資の必要がなく、煩雑なサーバー管理からも解放されます。


