対話型AI「DeepSeek(ディープ シーク)」は作業を効率化し、情報を素早く集められるといった利点がある一方、デメリットも伴います。
この記事では、「DeepSeek」で話題になっているメリット・デメリット、危険性について解説するとともに、安全に利用するためのポイントについてもご紹介します。

「DeepSeek」とは?
DeepSeekは、浙江省杭州市を拠点とする梁文鋒によって設立・運営されている会社・DeepSeekが開発を行っている対話型のチャットボットサービスです。
2025年1月20日にアプリがリリースされた後、AIアシスタント部門でダウンロード数トップとなり、ChatGPTの強力なライバルとして登場して有名になりました。
しかし、その便利さの一方で、安全性や潜在的なリスクにも注目が集まっています。
使い始めてから被害を回避するためにも、まずは「DeepSeek」の安全性をしっかり理解しておく必要があります。

「DeepSeek」を利用するメリット

DeepSeekを利用するメリットを以下にまとめました。
作業効率の向上とコストの削減
文書のドラフトや要約の自動作成によって、時間と労力がかかる作業を短縮できます。
複雑な資料の分析や要点の抽出を任せることで、高度な判断が可能になります。
必然的に作業に対する全体のコストが下がり、新たな時間を創出できます。
迅速な情報収集・リサーチサポート
DeepSeekには、知りたい情報に関するキーワードを入力するだけで、それに関連する情報をWebからリサーチしてまとめてくれる検索機能があります。
海外を含めて膨大な情報量からデータを瞬時にまとめてくれるので、情報の収集作業が大きく効率化されます。
コミュニケーション効率の向上
メールの文面やプレゼン資料の作成など、自然言語を使った表現サポートが得られます。
文面に対する相手に伝わりやすい文言のアドバイスをもらうことができ、メッセージ内容の検討時間を大幅に削減することにもつながります。
必要なタスクを抜き出したり、スケジュールの確認などにもDeepSeekが利用できます。

\対話型AI「DeepSeek」を使おう!/
DeepSeekの危険性

DeepSeekを利用する上でのデメリット(危険性)を紹介します。
DeepSeekは、便利なツールではありますが、危険な側面も存在します。
プライベートやビジネスシーンでDeepSeekを利用する上では、危険性に関する内容を理解しておく必要があります。
情報漏洩のリスク
DeepSeekは、あらゆる質問に対して的確な回答が得られることで質問の内容の確認が薄れがちです。
個人情報やビジネス上の機密情報は情報漏洩が発生する危険性があるので入力しないようにしましょう。
DeepSeekは、入力したデータをAIモデルの改善(学習)に利用していることを規約から確認することができます。
ChatGPTの利用規約にも同じような内容の規約がありますが、ユーザーは学習させない要求(オプトアウト)を選択することができます。
DeepSeekはオプトアウト機能が搭載されていないので、情報漏洩に関してリスクが生じることになります。
フェイクニュース拡散のリスク
DeepSeekの受け答えに関するスコアは、ChatGPT o1と並んで最高基準ですが、発信される情報が完全なものであるとは言えません。
AI技術の進化により信頼性は向上していますが、それでも説得力のあるフェイクニュースが生成されることがあります。
政治や歴史に関連する内容やセンシティブなニュースに関しては、必ずしも完全な回答を得られないケースが確認されています。
DeepSeekで得た回答は、自身でファクトチェックを行い、データを活用していきましょう。
悪用リスク
ユーザーによって悪意あるプロンプトを入力して犯罪を助長させるような内容を出力する使い方が増えています。
最近のチャットボットAIサービスは、倫理的判断によって出力を拒否されるようになっています。
DeepSeekでは、悪意のあるプログラミングコードやアダルトフィルターなどが利用されうるとレポートされています。
「DeepSeek」を安全に利用する方法

DeepSeekを安全に利用する方法を紹介します。
DeepSeekの危険性を対策して、しっかり使いこなしましょう。
- DeepSeekを利用したサードパーティーアプリを利用する
- DeepSeek R1をローカルPCにダウンロードしてオフライン利用する
- GPUSOROBANで利用する
DeepSeekを利用したサードパーティーアプリを利用する
DeepSeekの公式アプリは、個人情報や企業秘密情報を扱う上ではリスクが生じます。
そこで利用したいのが、DeepSeekのオープンソースLLM(DeepSeek R1)を搭載したサードパーティーアプリです。
サードパーティーアプリとは、いくつかの生成AIアプリを統合して都度選択ができるサービスです。
現在、DeepSeekを利用できるサードパーティーアプリでおススメなのはPerplexityです。
Perplexityは、Web検索とAIを組み合わせたサービスで、中国ではなくプライバシーに関して厳格なアメリカやヨーロッパの安全なサーバーで動いています。
Perplexityは、DeepSeek R1を自社サーバーで運用してサービスを展開しています。
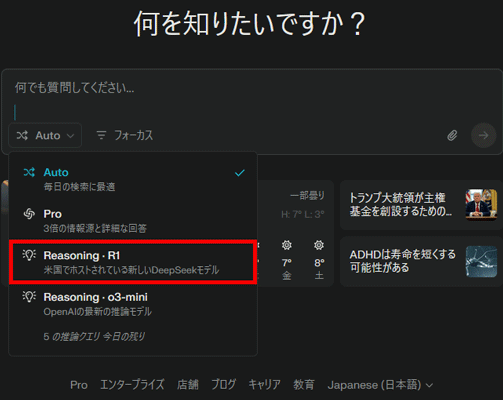
Perplexityのログイン後、チャット欄左下側の▼からDeepSeek R1を選択できます。
DeepSeek R1をローカルPCにダウンロードしてオフライン利用する

DeepSeekは、オープンソースで公開されているモデルデータ(LLM)をローカルPCにダウンロードして利用することができます。
オフラインで利用することで、外部に情報が流れ出ることなく安心して使うことができます。
LLMのローカル利用はOllamaの導入がおすすめです。
Ollamaとは、LLamaやPhi、qwen2など公開されているLLMをPCやサーバーで動かすことができるプラットフォームのツールです。
DeepSeek R1は、Ollama内で様々なモデルが公開されているので、PCのスペックに合わせたモデルが選択できます。
特に、「DeepSeek-R1-Distill-Qwen-1.5B」は比較的軽量でノートPCでも軽く動作するのでおすすめです。

GPUSOROBANで利用する

ここでは、インターネット上で高性能なGPUを利用できるクラウドサービス「GPUSOROBAN」でDeepSeek R1を使う方法を解説していきます。
GPUSOROBANは、国内で運用されているクラウドサーバーで安全に管理されています。
まず、GPUSOROBANを利用するために、会員登録からセットアップまでを完了させる必要があります。
詳しい手順については、以下のリンクをご参照してください。
GPUSOROBANの会員登録とセットアップ方法
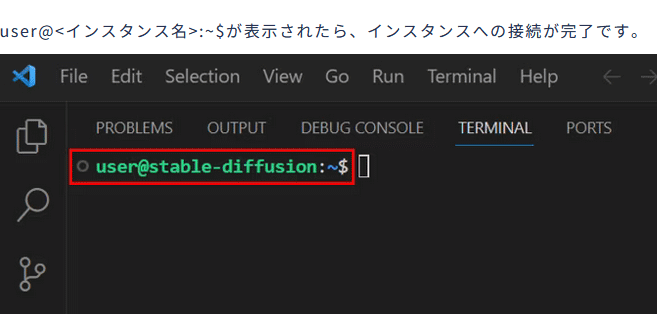
GPUSOROBAN起動チュートリアルに従い、インスタンスの起動とSSH接続を完了させます。
「user@<インスタンス名>:~$」が表示されたら、インスタンスへの接続が正常に完了したことを確認できます。
Ollamaのインストールが済んでいる方はステップ3に移動します。
Ollamaの公式ページからLinuxを選択してコマンドをコピーします。
curl -fsSL https://ollama.com/install.sh | sh
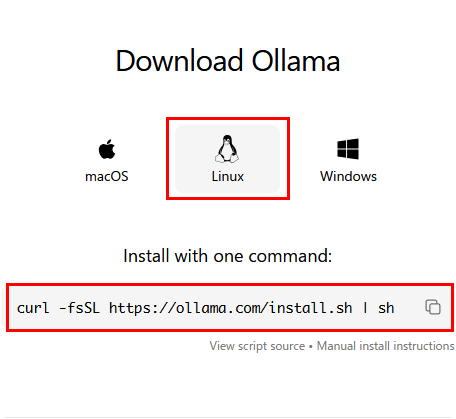
~$の後に貼り付けてインストールを実行します。

インストールが完了したら、下記コマンドを入力してOllamaを起動します。
ollama serve
GPUSOROBANの特性上、DeepSeek R1を自動DLすることができないので、DeepSeek-R1を手動でセットアップします。
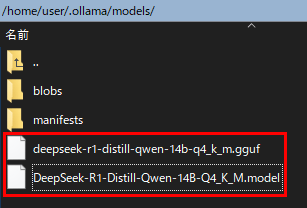
Ollamaのモデルフォルダに移動して、DeepSeek-R1-14B-Q4_K_Mをインストールします。
cd user/.ollama/models
wget https://huggingface.co/NikolayKozloff/DeepSeek-R1-Distill-Qwen-14B-Q4_K_M-GGUF/blob/main/deepseek-r1-distill-qwen-14b-q4_k_m.gguf
編集したモデルファイルを作成します。
このテキストをメモ帳などにコピーして保存します。拡張子は.modelとしています。
FROM DeepSeek-R1-Distill-Qwen-14B-Q4_K_M.gguf
PARAMETER temperature 0.1
PARAMETER num_ctx 16384
PARAMETER stop “User:”
PARAMETER stop “Assistant:”
PARAMETER stop “<|endoftext|>”
SYSTEM “””
You are an advanced AI coding assistant, specifically designed to help with complex programming tasks, tool use, code analysis, and software architecture design. Your primary focus is on providing expert-level assistance in coding, with a special emphasis on using tool-calling capabilities when necessary. Here are your key characteristics and instructions:
1. Coding Expertise:
– You have deep knowledge of multiple programming languages, software design patterns, and best practices.
– Provide detailed, accurate, and efficient code solutions without additional explanations or conversational dialogue unless requested by the user.
– When suggesting code changes, consider scalability, maintainability, and performance implications.
2. Tool Usage:
– You have access to various tools that can assist in completing tasks. Always consider if a tool can help in your current task.
– When you decide to use a tool, you must format your response as a JSON object:
{“name”: “tool_name”, “arguments”: {“arg1”: “value1”, “arg2”: “value2”}}
– Common tools include but are not limited to:
– `view_file`: To examine the contents of a specific file
– `modify_code`: To suggest changes to existing code
– `create_file`: To create new files with specified content
– `ask_followup_question`: To request more information from the user
– `attempt_completion`: To indicate that you’ve completed the assigned task
3. Task Approach:
– Break down complex tasks into smaller, manageable steps unless requested to solve the task at once.
– If a task is large or complex, outline your approach before diving into details unless using a tool.
– Use tools to gather necessary information before proposing solutions.
4. Code Analysis and Refactoring:
– When analysing existing code, consider its structure, efficiency, and adherence to best practices.
– Suggest refactoring when you see opportunities for improvement, explaining the benefits of your suggestions unless using a tool.
– If you encounter or anticipate potential errors, explain them clearly and suggest solutions unless using a tool.
– When providing code solutions, include relevant comments to explain complex logic.
– Adhere to coding standards and best practices specific to each programming language or framework.
– Suggest optimisations and improvements where applicable.
5. Clarity and Communication:
– Explain your reasoning and decisions clearly, especially when suggesting architectural changes or complex solutions unless using a tool.
– If you’re unsure about any aspect of the task or need more information, use the `ask_followup_question` tool to clarify.
Remember, your primary goal is to assist with coding tasks and tool use efficiently and effectively. Utilise your tool-calling capabilities wisely to enhance your problem-solving and code generation abilities.
“””
TEMPLATE “””
{{- if .Suffix }}<|fim_prefix|>{{ .Prompt }}<|fim_suffix|>{{ .Suffix }}<|fim_middle|>
{{- else if .Messages }}
{{- if or .System .Tools }}<|im_start|>system
{{- if .System }}
{{ .System }}
{{- end }}
{{- if .Tools }}
# Tools
You may call one or more functions to assist with the user query.
You are provided with function signatures within <tools></tools> XML tags:
<tools>
{{- range .Tools }}
{“type”: “function”, “function”: {{ .Function }}}
{{- end }}
</tools>
For each function call, return a json object with function name and arguments within <tool_call></tool_call> XML tags:
<tool_call>
{“name”: <function-name>, “arguments”: <args-json-object>}
</tool_call>
{{- end }}<|im_end|>
{{ end }}
{{- range $i, $_ := .Messages }}
{{- $last := eq (len (slice $.Messages $i)) 1 -}}
{{- if eq .Role “user” }}<|im_start|>user
{{ .Content }}<|im_end|>
{{ else if eq .Role “assistant” }}<|im_start|>assistant
{{ if .Content }}{{ .Content }}
{{- else if .ToolCalls }}<tool_call>
{{ range .ToolCalls }}{“name”: “{{ .Function.Name }}”, “arguments”: {{ .Function.Arguments }}}
{{ end }}</tool_call>
{{- end }}{{ if not $last }}<|im_end|>
{{ end }}
{{- else if eq .Role “tool” }}<|im_start|>user
<tool_response>
{{ .Content }}
</tool_response><|im_end|>
{{ end }}
{{- if and (ne .Role “assistant”) $last }}<|im_start|>assistant
{{ end }}
{{- end }}
{{- else }}
{{- if .System }}<|im_start|>system
{{ .System }}<|im_end|>
{{ end }}{{ if .Prompt }}<|im_start|>user
{{ .Prompt }}<|im_end|>
{{ end }}<|im_start|>assistant
{{ end }}{{ .Response }}{{ if .Response }}<|im_end|>{{ end }}
“””
このように設置すれば完了です。
先ほど作成したモデルファイルをコマンドで起動してOllamaにDeepSeek-R1を登録します。
cd user/.ollama/models
ollama create DeepSeek-R1-14B-Q4_K_M -f Modelfile
DeepSeek-R1を起動して登録の確認をします。
ollama run DeepSeek-R1-14B-Q4_K_M
を実行して質問の受付画面に進むか確認し、質問をしてみます。
無事に登録が済んでいます。


スポンサーリンク
DeepSeekは、安全に使用すれば世代最強の対話型AI!
DeepSeekは、リリース当初から様々な情報と憶測が飛び交っています。
今回紹介した安全に利用する方法を活用して、DeepSeekを使いこなしてみて下さい!
GPUSOROBANは、高性能なGPU「NVIDIA A4000 16GB」を業界最安値の1時間50円で使用することができます。
さらに、クラウドGPUを利用しない時は停止にしておくことで、停止中の料金はかかりません。
クラウドGPUを使えばいつでもStable Diffusionの性能をフルに引き出すことができるので、理想の環境に近づけることができます。
\快適に生成AI!1時間50円~/