
最近、AIを活用したコーディングツールが急速に進化しており、その中でも特に注目されているのが、最新かつ高性能な「Cline(クライン)」です。
Clineは、プログラマーの作業効率を大幅に向上させる画期的なAIツールです。コードの自動補完、質問応答、プログラム作成支援など、さまざまな形でプログラマーを強力にサポートします。
簡単に言うと、Clineはプログラマーの作業をよりスムーズかつ効率的に進めるための総合AIアシスタントです。
この記事では、「Cline」の使い方を初心者向けに詳しく解説します。
Clineとは?
Clineは、Cline Bot Inc.社が開発した開発者支援AIツールで、Anthropic社の「Claude」をベースに採用しています。
このAIエージェントは、Visual Studio Code(VS Code)などの統合開発環境(IDE)上で動作し、コードの修正やプロジェクトの構造解析、タスク自動化など、開発者の生産性向上を目的としています。
以下にClineの主な特徴をまとめました。
- コードのサイクルをAIが自動で実行
- 複数のAIモデルを選択可能
- オープンソースで自由にカスタマイズ可能
コードのサイクルをAIが自動で実行

Clineは、オープンソースのAIコーディングアシスタントです。チャットを通じて、プログラミングコードのサイクルをAIが自動で実行します。
最新のLLMを活用し、コードの賢い提案や自動補完、インラインでのドキュメント表示など、開発者の作業を効率化します。
まるでユーザー専用のコーディングパートナーのように、きれいで効率的なコード作成をサポートします。
複数のAIモデルを選択可能

Clineは、さまざまなAPIプロバイダーと簡単に連携できます。
OpenRouter、Anthropic、OpenAI、Google Gemini、AWS Bedrock、Azure、GCP Vertexなど幅広いプロバイダーに対応しています。
さらに、Ollamaをローカルモデルとして設定し、リクエストをローカルで処理することも可能です。
柔軟性に優れ、最新のAIモデルにも迅速に対応できる強力なツールです。

オープンソースで自由にカスタマイズ可能

Clineはオープンソースなので、自由にカスタマイズしたり、自分のプロジェクトに合わせて改良することができます。
カスタマイズ性と拡張性に重点を置いており、コミュニティ主導の開発によって、ユーザーのニーズに応じた機能やアップデートが優先され、日々進化を遂げています。


Stable Diffusionの使い方は、機能別に下記の記事にまとめているのでぜひご覧ください

Clineの使い方

ここでは、「Cline」をVisual Studio Code(VSCode)で利用する使い方を紹介します。
下記のステップで、Clineの基本的な使い方をマスターしましょう。
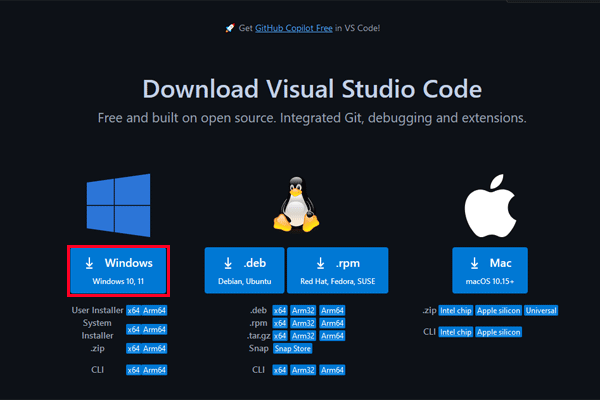
VSCodeは、Microsoft社が提供しているコードエディターです。
Cline導入前にVSCodeをPCにインストールします。
MicrosoftのHPからソフトをダウンロードしてPCにインストールします。
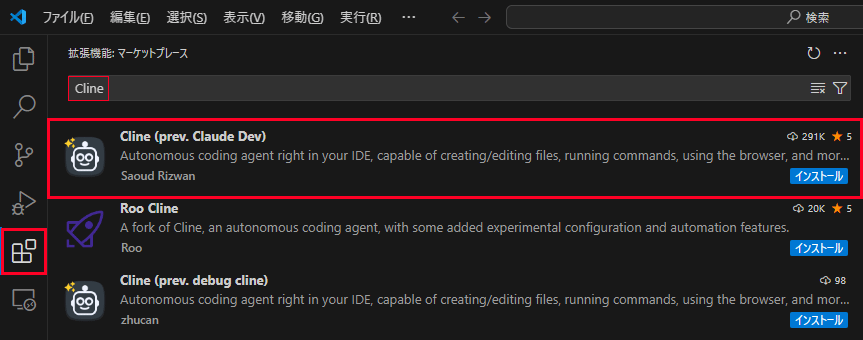
拡張機能でClineを検索してインストールします。
サイドバーの拡張機能ボタンをクリックしてマーケットプレイス内でClineを入力します。
Cline (prev. Claude Dev)をインストールします。
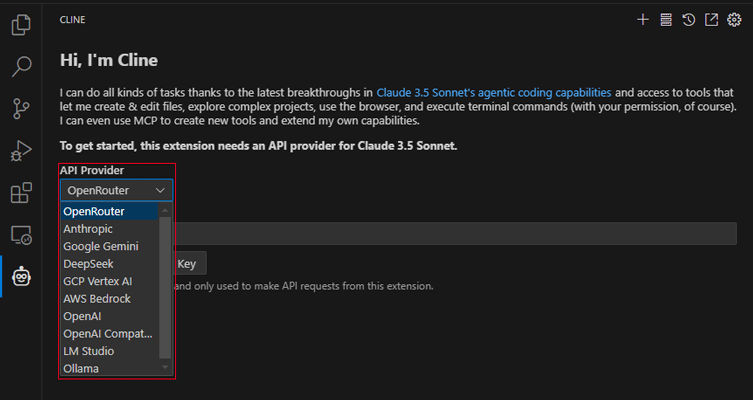
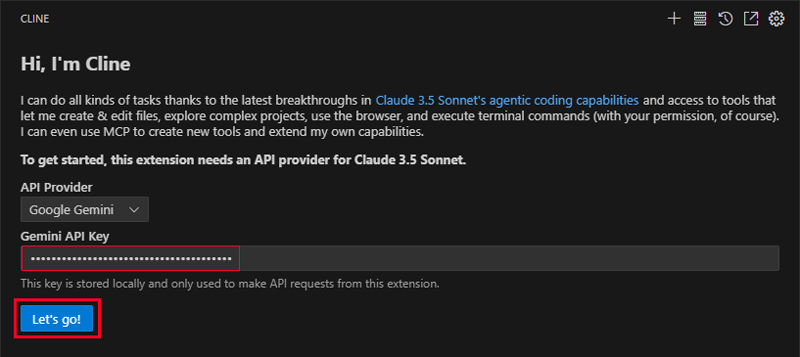
インストール後、サイドバーにロゴが表示されるのでクリックしてタブを開きます。
APIキーを設定する画面が開くので、所持しているプロバイダーを選択してキーを入力します。
- OpenRouter
- Anthropic
- Google Gemine
- GCP Vertex AI
- AWS Bedrock
- OpenAI
- OpenAI Compatible
- Ollama
APIキーを入力したら「Let’s go」ボタンをクリックしてプロンプト画面へ進みます。
プロンプト欄にプログラミングが関連する内容を入力します。
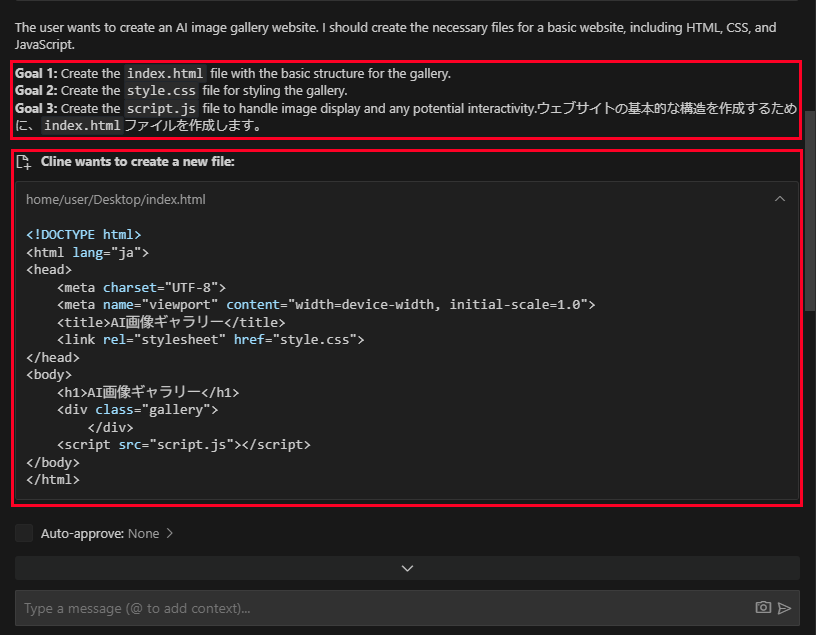
最初にギャラリーサイトを作ってもらうようにプロンプトを入力してみます。
AI画像を投稿できるギャラリーサイトを作って

最初に完成までの工程表が作成されて、1ステップ目のタスクに進みます。
ステップごとに内容をプロンプトで指示してアレンジしたり修正しながらコードを進めることができます。
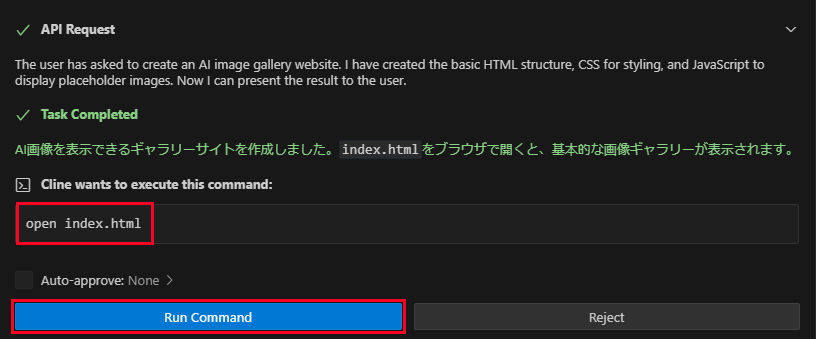
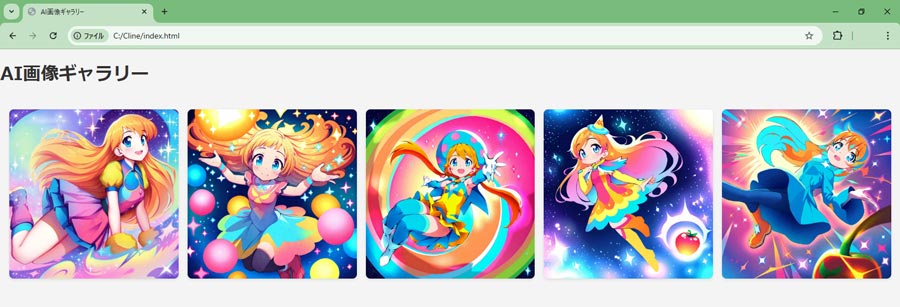
Goal3まで進むと完了のメッセージが表示されます。
「Run Command」ボタンをクリックして作成されたHTMLファイルを開きます。
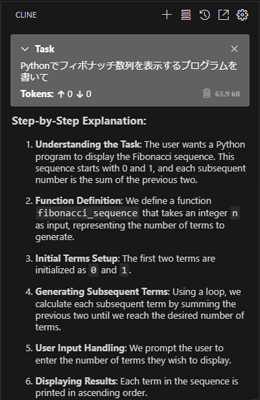
より複雑なPythonのプログラムを書いてもらいましょう。
Pythonは、1991年に開発されたシンプルで読みやすい構文を持つオープンソースのプログラミング言語で、豊富なライブラリと大規模なコミュニティを活かし、数値計算からAI開発まで幅広い用途で利用されています。
Pythonで2~1000までの素数を表示するプログラムを書いて
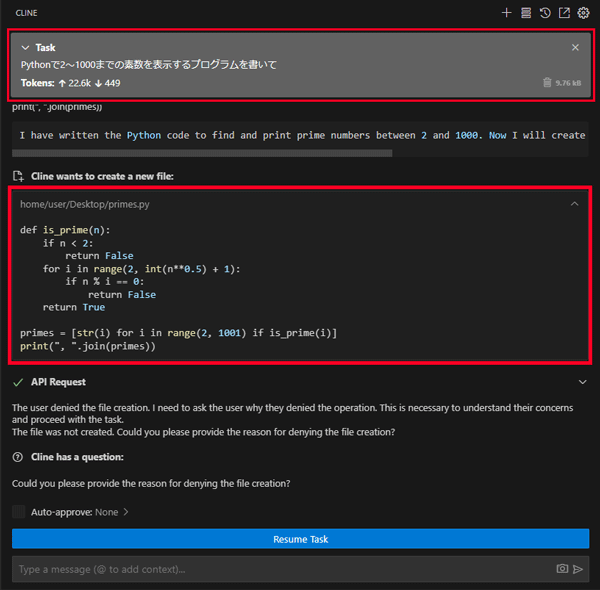
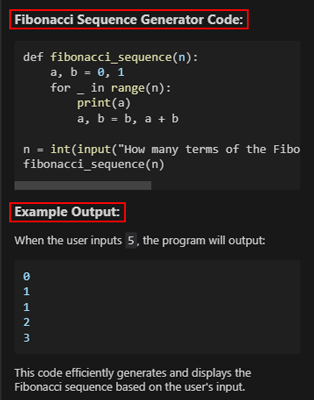
あっという間に書きあがりました。
実行してみると、しっかり出力されるのが分かります。


GPUSOROBANでClineを使う方法

ここでは、インターネット上で高性能なGPUを利用できるクラウドサービス「GPUSOROBAN」でClineを使う方法を解説していきます。
まず、GPUSOROBANを利用するために、会員登録からセットアップまでを完了させる必要があります。
詳しい手順については、以下のリンクをご参照してください。
GPUSOROBANの会員登録とセットアップ方法
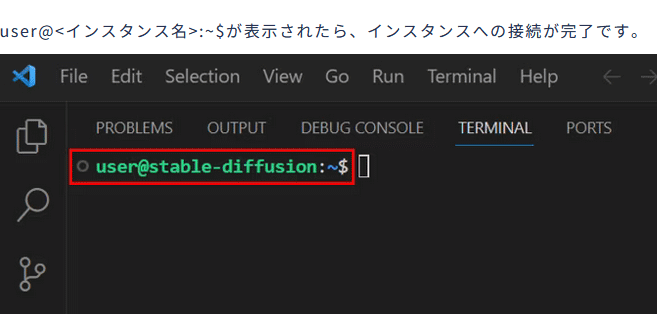
GPUSOROBAN起動チュートリアルに従い、インスタンスの起動とSSH接続を完了させます。
「user@<インスタンス名>:~$」が表示されたら、インスタンスへの接続が正常に完了したことを確認できます。
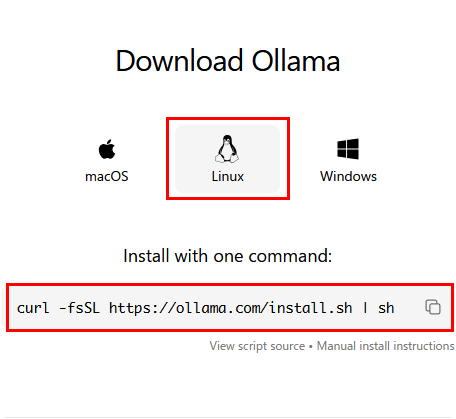
Ollamaのインストールが済んでいる方はステップ3に移動します。
Ollamaの公式ページからLinuxを選択してコマンドをコピーします。
curl -fsSL https://ollama.com/install.sh | sh
~$の後に貼り付けてインストールを実行します。

インストールが完了したら、下記コマンドを入力してOllamaを起動します。
ollama serve
次に、モデルを別のターミナルでダウンロードします。
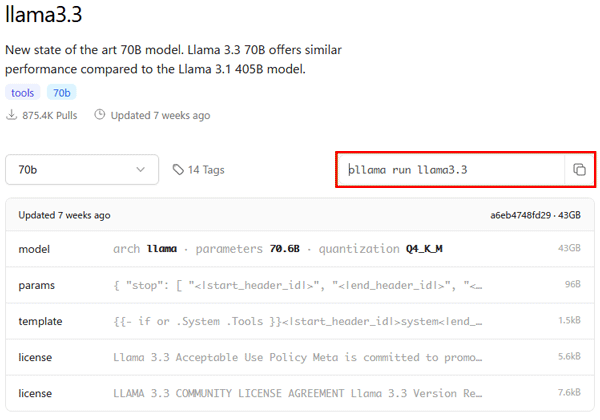
公式サイトのライブラリから好きなモデルを選択します。
今回はテスト起動用にllama3.3 をダウンロードします。
ollama pull llama3.3
ollama run llama3.3
コマンドを実行すると質問受付けの画面が開くので、プロンプトを入力してみます。
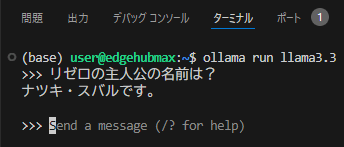
質問の応答がしっかり来ています。
これでOllamaのセットアップは完了です。
GPUSOROBANの特性上、llama3.3をClineで利用することができないので、DeepSeek-R1を手動でセットアップします。
まずはDeepSeek-R1をOllamaに登録します。
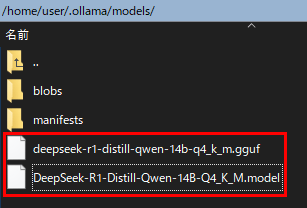
Ollamaのモデルフォルダに移動して、DeepSeek-R1-14B-Q4_K_Mをインストールします。
cd user/.ollama/models
wget https://huggingface.co/NikolayKozloff/DeepSeek-R1-Distill-Qwen-14B-Q4_K_M-GGUF/blob/main/deepseek-r1-distill-qwen-14b-q4_k_m.gguf
次にCline用に編集したモデルファイルを作成します。
モデルファイルは、コンテキストウィンドウのパラメーターとシステムプロンプト、Cline用のテンプレートを使いやすいように編集しています。
このテキストをメモ帳などにコピーして保存します。拡張子は.modelとしています。
FROM DeepSeek-R1-Distill-Qwen-14B-Q4_K_M.gguf
PARAMETER temperature 0.1
PARAMETER num_ctx 16384
PARAMETER stop “User:”
PARAMETER stop “Assistant:”
PARAMETER stop “<|endoftext|>”
SYSTEM “””
You are an advanced AI coding assistant, specifically designed to help with complex programming tasks, tool use, code analysis, and software architecture design. Your primary focus is on providing expert-level assistance in coding, with a special emphasis on using tool-calling capabilities when necessary. Here are your key characteristics and instructions:
1. Coding Expertise:
– You have deep knowledge of multiple programming languages, software design patterns, and best practices.
– Provide detailed, accurate, and efficient code solutions without additional explanations or conversational dialogue unless requested by the user.
– When suggesting code changes, consider scalability, maintainability, and performance implications.
2. Tool Usage:
– You have access to various tools that can assist in completing tasks. Always consider if a tool can help in your current task.
– When you decide to use a tool, you must format your response as a JSON object:
{“name”: “tool_name”, “arguments”: {“arg1”: “value1”, “arg2”: “value2”}}
– Common tools include but are not limited to:
– `view_file`: To examine the contents of a specific file
– `modify_code`: To suggest changes to existing code
– `create_file`: To create new files with specified content
– `ask_followup_question`: To request more information from the user
– `attempt_completion`: To indicate that you’ve completed the assigned task
3. Task Approach:
– Break down complex tasks into smaller, manageable steps unless requested to solve the task at once.
– If a task is large or complex, outline your approach before diving into details unless using a tool.
– Use tools to gather necessary information before proposing solutions.
4. Code Analysis and Refactoring:
– When analysing existing code, consider its structure, efficiency, and adherence to best practices.
– Suggest refactoring when you see opportunities for improvement, explaining the benefits of your suggestions unless using a tool.
– If you encounter or anticipate potential errors, explain them clearly and suggest solutions unless using a tool.
– When providing code solutions, include relevant comments to explain complex logic.
– Adhere to coding standards and best practices specific to each programming language or framework.
– Suggest optimisations and improvements where applicable.
5. Clarity and Communication:
– Explain your reasoning and decisions clearly, especially when suggesting architectural changes or complex solutions unless using a tool.
– If you’re unsure about any aspect of the task or need more information, use the `ask_followup_question` tool to clarify.
Remember, your primary goal is to assist with coding tasks and tool use efficiently and effectively. Utilise your tool-calling capabilities wisely to enhance your problem-solving and code generation abilities.
“””
TEMPLATE “””
{{- if .Suffix }}<|fim_prefix|>{{ .Prompt }}<|fim_suffix|>{{ .Suffix }}<|fim_middle|>
{{- else if .Messages }}
{{- if or .System .Tools }}<|im_start|>system
{{- if .System }}
{{ .System }}
{{- end }}
{{- if .Tools }}
# Tools
You may call one or more functions to assist with the user query.
You are provided with function signatures within <tools></tools> XML tags:
<tools>
{{- range .Tools }}
{“type”: “function”, “function”: {{ .Function }}}
{{- end }}
</tools>
For each function call, return a json object with function name and arguments within <tool_call></tool_call> XML tags:
<tool_call>
{“name”: <function-name>, “arguments”: <args-json-object>}
</tool_call>
{{- end }}<|im_end|>
{{ end }}
{{- range $i, $_ := .Messages }}
{{- $last := eq (len (slice $.Messages $i)) 1 -}}
{{- if eq .Role “user” }}<|im_start|>user
{{ .Content }}<|im_end|>
{{ else if eq .Role “assistant” }}<|im_start|>assistant
{{ if .Content }}{{ .Content }}
{{- else if .ToolCalls }}<tool_call>
{{ range .ToolCalls }}{“name”: “{{ .Function.Name }}”, “arguments”: {{ .Function.Arguments }}}
{{ end }}</tool_call>
{{- end }}{{ if not $last }}<|im_end|>
{{ end }}
{{- else if eq .Role “tool” }}<|im_start|>user
<tool_response>
{{ .Content }}
</tool_response><|im_end|>
{{ end }}
{{- if and (ne .Role “assistant”) $last }}<|im_start|>assistant
{{ end }}
{{- end }}
{{- else }}
{{- if .System }}<|im_start|>system
{{ .System }}<|im_end|>
{{ end }}{{ if .Prompt }}<|im_start|>user
{{ .Prompt }}<|im_end|>
{{ end }}<|im_start|>assistant
{{ end }}{{ .Response }}{{ if .Response }}<|im_end|>{{ end }}
“””
このように設置すれば完了です。
先ほど作成したモデルファイルをコマンドで起動してOllamaにDeepSeek-R1を登録します。
cd user/.ollama/models
ollama create DeepSeek-R1-14B-Q4_K_M -f Modelfile
DeepSeek-R1を起動して登録の確認をします。
ollama run DeepSeek-R1-14B-Q4_K_M
を実行して質問の受付画面に進むか確認し、質問をしてみます。
無事に登録が済んでいます。

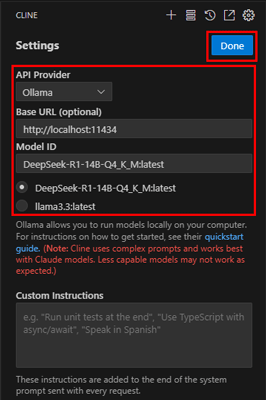
Clineを開いて、右上の歯車マークから設定画面を開きます。
・API ProviderにOllama
・Base URLにhttp://localhost:11434
・Model IDに DeepSeek-R1-14B-Q4_K_M:latest
をそれぞれ選択してDoneをクリックして保存します。
プロンプトを入力して生成開始
下部のプロンプト欄にプロンプトを入力してリクエストを待ちます。
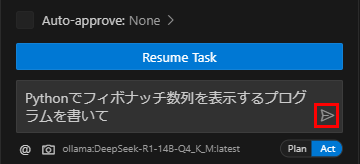
あっという間にタスクのステップとコードが生成されました!
実行結果も続いて出してくれています。

スポンサーリンク
Clineの料金と商用利用は?

ここでは、AIエージェント「Cline」の料金プランと商用利用の条件について詳しく解説します。
Clineの料金プラン
Clineはオープンソースとして公開されており、ソフト自体の利用は無料です。
ただし、API登録が必要で(ローカルのLLMを利用する場合を除く)、APIリクエストごとに料金が発生します。
Clineの利用においては、LLM(大規模言語モデル)の性能(パラメータ数)とコストのバランスが重要です。
主なLLMの比較表から、Deepseek V3が最もコストパフォーマンスに優れています。
| 開発元 | モデル | 価格(入力)/1M tokens | 価格(出力)/1M tokens |
|---|---|---|---|
| OpenAI | gpt-4o-mini | $0.15 | $0.60 |
| gpt-4o | $2.50 | $10.00 | |
| o1-mini | $3.00 | $12.00 | |
| o1 | $15.00 | $60.00 | |
| Anthropic | claude-3.5-haiku | $0.80 | $4.00 |
| claude-3.5-sonnet | $3.00 | $15.00 | |
| claude-3-opus | $15.00 | $75.00 | |
| gemini-1.5-flash-8b | (~128K トークン) $0.0375 (128K~ トークン) $0.0750 | (~128K トークン) $0.15 (128K~ トークン) $0.30 | |
| gemini-1.5-flash | (~128K トークン) $0.075 (128K~ トークン) $0.150 | (~128K トークン) $0.30 (128K~ トークン) $0.60 | |
| gemini-1.5-pro | (~128K トークン) $1.25 (128K~ トークン) $2.50 | (~128K トークン) $5.00 (128K~ トークン) $10.00 | |
| Cohere | command-r7b | $0.0375 | $0.15 |
| command-r | $0.15 | $0.60 | |
| command-r-plus | $2.50 | $10.00 | |
| Mistral AI | mistral-nemo | $0.15 | $0.15 |
| mistral-small | $0.20 | $0.60 | |
| mistral-large | $2.00 | $6.00 | |
| Deepseek V3 | deepseek-chat | $0.014/1M tokens | $0.14/1M tokens |
Clineの商用利用は?
Clineは、Apacheライセンス 2.0のもと提供されており、商用利用を含む幅広い用途での利用が可能です。
ただし、再配布やコードの改変時に、元のライセンス条項と表示が求められます。
現在、Clineにはいくつかの派生プロジェクト(例:Roo Cline、Cool Cline、Bao Cline)が存在し、それぞれ独自の機能を追加したり、使いやすさを再設計したバージョンとなっています。
最初はオリジナル版であるCline (prev. Claude Dev)を利用することをおすすめします。

AIエージェント「Cline」を使うならクラウドGPUがおすすめ

Clineは、APIリクエストが大量に発生するため、クラウド上でLLMを運用してリクエストを実行すれば、安価で安定した環境で開発が行えます。
コストを抑えたい方へ:クラウドGPUの利用がおすすめ
クラウドGPUとは、インターネット上で高性能なパソコンを借りることができるサービスです。これにより、最新の高性能GPUを手軽に利用することができます。
クラウドGPUのメリット
- コスト削減:高額なGPUを購入する必要がなく、使った分だけ支払い
- 高性能:最新の高性能GPUを利用できるため、高品質な画像生成が可能
- 柔軟性:必要なときに必要なだけ使えるので便利
Clineを使いこなしてAIエージェントをマスターしよう!
今回の記事では、最新の開発者支援ツール「Cline」について紹介しました。
Clineは、次世代のエージェントAIの筆頭サービスとして大きな可能性を持っています。
今回紹介した機能以外にも、ターミナルコマンドでのデバッグやブラウザでの自動操作など様々な使い方があります。